Create Favicon Icons For Your Websites!
Have you ever wondered how to create favicon icons for your websites or WordPress blogs? Or have you even, like me (-, I don’t know whether I should admit this, this is sort of embarrassing! :0 ), always admired the little icons other websites have next to their website names in the browser, but had no idea how to do the same for your sites because you didn’t even know that they were called “favicons”, so you couldn’t look it up???
Anyway, there I was, not looking to create favicon icons ’cause I didn’t know them, and then I stumbled across this blog post on 15 Essential Checks Before Launching Your Website (great site, btw, you should bookmark it). And there, as the first item to do/check for your site was – to create a favicon! Favicons help brand your website, and your visitors will be able to visually pick out your site amongst others much easier.
Well, I obviously could not resist temptation and start looking around for everything favicon after I now knew what these little pictures were called, and as you might see, – I even created one myself! 🙂
What is a favicon?
“A favicon (short for favorite icon, sometimes understood as favorites icon), also known as a website icon, shortcut icon, url icon, or bookmark icon is a 16×16 pixel square icon associated with a particular website or webpage. A web designer can create such an icon and install it into a website (or webpage) by several means, and most graphical web browsers will then make use of it. Browsers that provide favicon support typically display a page’s favicon in the browser’s Address bar and next to the page’s name in a list of bookmarks. Browsers that support a tabbed document interface typically show a page’s favicon next to the page’s title.” Wikipedia
So here is how it goes (even for non-techies!):
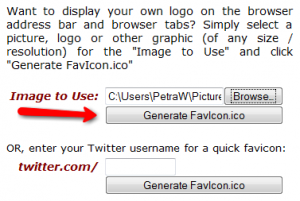
- There are quite a few sites out there which let you create favicon icons for free; you can choose any one of them. I created mine through http://www.html-kit.com/favicon/ You can browse your computer for the image you want to use (I first copied my header picture into my free photobucket album and then cropped it, and saved it back on my computer). Then click on “Generate FavIcon.ico”. Pretty self-explanatory, really!

create favicon This will create your first favicon.
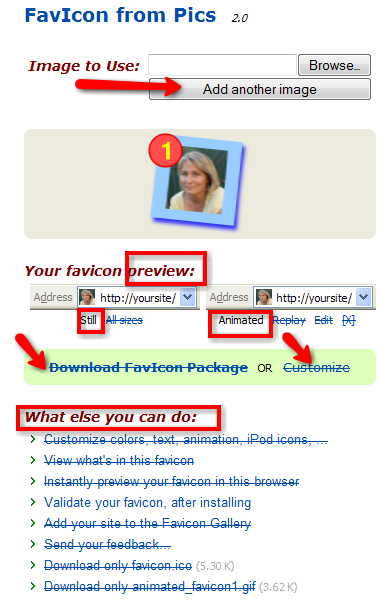
- Once created, you will be on a page where you can either download your favicon straight away, or customize it first; you can also add more favicons if you are not happy with the supplied favicon preview (still or animated)

create favicon So have a bit of a play around until you come up with one you like!
- Once you have created a favicon you are happy with, click on “Download FavIcon Package” to download it to your computer. Unzip it. There are quite good instructions on the website as to how to proceed from here, but I am going to go through it anyway.
- When you have unzipped the Package, you should have an “animated favicon” and a “favicon” picture plus the “Read me” text on your computer. It can’t hurt to read through the “Read me” text.
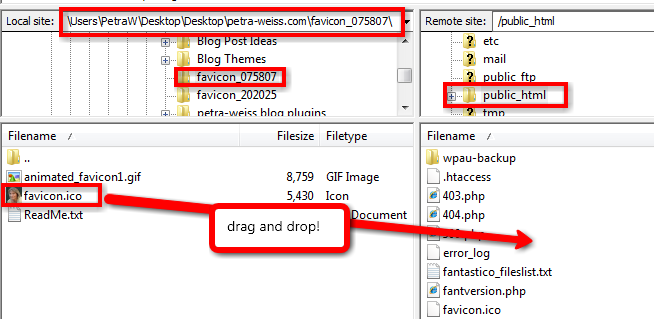
- I would only upload the favicon you are going to use to your website. I have chosen the normal “favicon”, not the animated one. So you need to log into your FTP program (I am using FileZilla) and upload your favicon to your webspace. All you have to do is locate the favicon on your computer and then drag and drop it into the public_html folder of your webspace:

- In the instructions it reads now “Add following HTML tags to your web page after the <head> tag but before the </head> tag:“
- if you have a WordPress site, log into your wp-admin and go to “Appearance” and “Theme Editor” (I am in WP Version 2.7, previous versions it would be “Design” and “Editor” I think). You will find your <head> </head> tags in the theme file called header.php. I would go ahead and add the provided HTML tags straight after the <head> tag.
- if you do not have a WordPress site, you need to open your website with your HTML Editor (I use Kompozer) and do the same.
- Make sure you distinguish between the favicon.ico and the animated_favicon1.gif:
- if you use the favicon.ico, only add it’s respective HTML tags to your web page ( <link rel=”shortcut icon” href=”favicon.ico”> )
- if you use the animated_favicon.gif, add it’s respective HTML tags to your web page ( <link rel=”icon” type=”image/gif” href=”animated_favicon1.gif”>)
There you have it – you have just created a favicon for your website! You have to be a bit patient though – what threw me after I had created mine was that it didn’t appear straight away. So I thought I had done something wrong and started looking for answers. But I had to find out that it sometimes can take up to 24 hours for the favicon to appear. So be patient, and your favicon should show up in your browser soon! 🙂
Hi Petra,
What a great tip!
I have made favicons before and I thought I had one on my blog, but I noticed I haven’t. I have one on my hosting site 1066hosting.com (that was when I was going to sell hosting but decided against it).
Your tip looks a lot easier than making one in Photoshop. I will have to give it a go.
By the way, yours looks nice. Much better than the hosting one you had before. More personal.
I can see lots of little favicons appearing now on other people’s blogs.
Time to get working on my favicons now.
Keep up the great work.
Regards,
Gary
Hi Gary, I am glad I could give you some “help” for once, not the other way around! 🙂
I agree about smashingmagazine, I bookmarked it some years ago, very inspiring.